
Powder Electrostatic Spraying Process: Complete Workflow and Common Defect Troubleshooting Guide
When you're running a metal manufacturing operation—whether it's producing cabinets, outdoor furniture, or aluminum profiles—one thing becomes crystal clear: surface quality directly impacts your bottom line. That's why so many factories like ours are investing in electrostatic powder coating[^1] lines. But here's what we've learned the hard way: having the equipment isn't the same as mastering the process.
A powder electrostatic spraying system uses charged powder particles, electrostatic attraction, and heat curing to create uniform, durable coatings on metal parts. The complete workflow includes pre-treatment to remove contaminants, powder application by static charge, and thermal curing to form the final layer. Common issues like uneven coating thickness, poor adhesion, and defects stem from inadequate pre-treatment, unstable air pressure, poor grounding, or improper curing temperature—each diagnosable through a logical sequence of equipment and material checks rather than random parameter adjustment.
Over the years working with hundreds of production lines, we've discovered that most coating problems don't actually happen during spraying. They start much earlier—or come from places operators never think to check. This guide walks you through what we consider the real sequence of things that matter.
 )
)
What Is Powder Electrostatic Spraying and Why It Matters
Powder electrostatic spraying is fundamentally different from traditional wet painting. Instead of liquid paint that needs solvents, you're applying dry powder particles that stick to your workpiece through electrostatic force, then fused into a solid coating through heat.
The core advantage? No VOC emissions[^2], higher material utilization (typically 90%+ compared to 60-70% for liquid spray), thicker and more durable coatings, and faster production cycles. For metal fabricators making everything from switchgear cabinets to outdoor seating to aluminum extrusions, this technology has become the standard because customers expect that level of quality and durability.
But—and this is critical—the powder coating process is only as good as every stage that precedes the actual spraying. We've seen factories with excellent spray booths still struggle because their pre-treatment was inconsistent, or their compressed air system was delivering moisture that sabotaged the whole line. The technology works. The skill is knowing what to monitor.
Core Components of a Powder Spraying Line and Their Functions
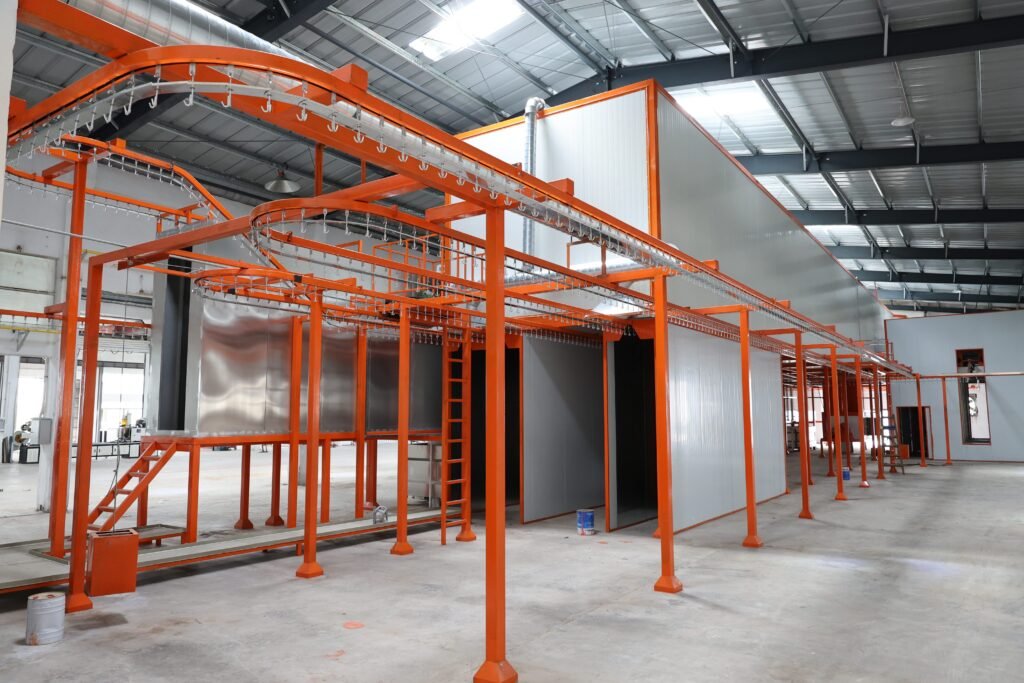
A complete electrostatic powder coating line isn't a single machine—it's a coordinated system. Each component has a specific job, and when one part starts to drift, the whole line's output suffers.
Pre-treatment System: Foundation for Quality
Before powder ever gets near your workpiece, the surface has to be absolutely clean. Pre-treatment removes oils, oxides, rust, dust, and any trace of contamination that would prevent the powder from bonding properly.
The typical sequence goes: degreasing (hot alkaline wash), rinsing, acid pickling or abrasive treatment to remove rust and oxidation, another rinse, phosphate or conversion coating[^3] application, final rinse, and drying. Each step matters. We've traced adhesion failures back to inadequate drying times (moisture trapped under the coating), incomplete phosphate film formation (too thin or uneven), or residual salt from the previous rinse stage.
From our experience, this is where 80% of quality problems actually originate. Operators often focus all their energy adjusting spray distance, voltage, and powder feed rate—meanwhile, the pre-treatment is creating invisible defects that won't show up until the coating is on the truck heading to the customer.
Spray Booth: Charging and Application Stage
The spray booth is where the visible work happens. Powder enters through the spray gun where it gets electrostatically charged. The workpiece, sitting on a grounded conveyor, becomes the opposite polarity, creating attraction between the powder and the surface.
A good spray booth design considers booth geometry, air flow patterns, lighting, powder recovery efficiency, and operator safety. The booth isn't just a box—it's engineered to balance uniform application with efficient powder recovery. We typically see single separation efficiency[^4] rates of 90-95% from well-designed cyclone recovery, which means less powder waste and lower material costs.
Curing Oven: Fusion and Crosslinking
Once powder lands on the workpiece, it has to be fused and cured. This happens in the curing oven—typically maintained at 350–450°F (177–232°C) depending on the powder formulation—where the powder melts, flows to form a continuous layer, and undergoes chemical crosslinking to create the final hard, durable finish.
The key detail most operators miss: the oven isn't just maintaining air temperature. It's controlling the actual temperature of the workpiece, which depends on material thickness, part density, loading density, and air circulation patterns. We've seen over-curing problems (yellowing, brittleness) and under-curing problems (weak adhesion, poor chemical resistance) from operators who only watched the thermometer instead of understanding what temperature the parts themselves were actually reaching.
Powder Recovery and Recycling System
Powder that doesn't land on the workpiece doesn't disappear—it's captured by the recovery system. Modern systems use cyclone separation[^5] (first stage) and high-efficiency filter cartridges (secondary recovery) to separate unused powder from exhaust air. The recovered powder can be reused, dramatically improving material economy.
The efficiency of this system affects both your costs and your shop environment. Poor recovery means higher material waste, more dust, and environmental issues. We always recommend clients invest in robust secondary recovery rather than trying to cheap out—the long-term operational cost difference is substantial.

How Powder Electrostatic Spraying Works: The Three-Stage Process
Understanding the actual mechanics helps you diagnose problems more logically instead of just randomly twisting knobs.
Electrostatic Charging and Attraction
Inside the spray gun, a high-voltage electrode (typically 60–90 kV) imparts a negative charge to powder particles as they pass through. The workpiece is grounded, creating a potential difference. This electrostatic field acts like invisible magnets pulling charged powder toward the grounded surface.
The workpiece must be reliably grounded. If grounding is poor—loose contact between the part and fixture, oxide buildup on the fixture, or contamination—the electrostatic field weakens. You'll see lower transfer efficiency, uneven coverage, and powder bouncing off instead of sticking. This is one of the most underestimated variables in powder coating. A technical team should check electrical resistance[^6] from workpiece through the entire conductive path regularly.
Powder Application and Deposition
As powder approaches the grounded surface, the electrostatic field pulls it into contact. The first powder particles create a thin insulating layer, which actually slows further deposition—this is why spray distance, voltage, and application time are all interdependent. Too much voltage and you get edge buildup and "wraparound" (powder depositing on the back of the part even when not sprayed). Too little and you get poor coverage and inadequate film thickness.
Application time depends on your conveyor speed. Line the workpieces too densely and they shield each other. Space them too far apart and you're not optimizing capacity. We typically recommend working with your equipment supplier to model the optimal spacing for your specific part geometry and target film thickness.
Curing and Coating Formation
Once on the workpiece, uncured powder sits as a dry layer. In the oven, three things happen in sequence:
First, the powder melts—the resin base softens and flows, filling micro-gaps in the surface.
Second, the powder flows and levels—this creates that smooth, uniform appearance customers expect.
Third, the powder undergoes chemical crosslinking[^7]—the resin molecules bond together, creating the hard, chemically resistant finish.
If your oven temperature is too low or dwell time too short, you get incomplete crosslinking. The coating feels soft, adhesion is weak, and chemical resistance is poor. If temperature is too high or time too long, the coating can over-cure: it becomes brittle, can yellow or discolor, and mechanical properties actually decline.
The right cure is specific to each powder formulation. Always follow the powder supplier's technical data sheet. And—this matters—monitor the actual workpiece temperature, not just the oven air temperature. A thermal imaging camera is a worthwhile investment for any serious operation.
Critical Infrastructure Conditions That Impact Spraying Quality
Your line's actual performance depends heavily on things that exist outside the line itself.
Compressed Air System: Cleanliness and Dryness Are Non-Negotiable
Compressed air powers the atomization in the spray gun, operates the pneumatic systems, and activates control valves throughout the line. But air often contains moisture, oil droplets, and particulates from the compressor.
This contaminated air gets sprayed directly into the powder coating. Water droplets cause pinhole defects (tiny holes that form when moisture evaporates during curing). Oil causes shrinkage and surface irregularities. Particulates cause visible specks and rough patches.
We've walked into factories where operators were convinced their spray guns were faulty or their powder was bad. The real problem: the air system hadn't been serviced properly. A good compressed air setup includes:
- Refrigerated or desiccant dryer (maintaining dew point around -4°C or lower)
- Multi-stage filtration (20 µm, 3 µm, and 0.5 µm stages)
- Regular water trap draining (daily for high-humidity environments)
- Pressure regulation to maintain stable 4–6 kg/cm²
- Annual filter cartridge replacement
Your air budget matters more than most operators realize. We typically recommend checking your air system before you adjust anything else on the line.
Grounding Quality: Ensuring Stable Electrostatic Field
We mentioned this briefly earlier, but grounding deserves its own section because the impact is so significant.
When workpiece grounding is poor, the electrostatic field becomes unstable. You'll see:
- Uneven coating deposition (thick in some areas, thin in others)
- Powder transfer inefficiency (more overspray, less material landing on the part)
- Localized spray-off or complete coverage gaps
- Increased powder waste
- Potential operator safety issues from stray discharge
Grounding depends on the entire conductive path: from the workpiece → fixture → support structure → grounding cable → the spray booth ground. If any connection has high resistance—due to oxide, dirt, rust, or loose fastening—the whole system suffers.
We recommend checking grounding resistance from time to time. Target is typically under 1 megohm. If it's higher, clean contact surfaces and retighten all connections.
Workpiece Temperature Monitoring During Curing
We mentioned this in the curing section, but it bears repeating because it's so often done wrong: operators check the oven thermostat, assume all is well, and move on.
The oven's air temperature and the workpiece's actual temperature can be very different, especially for thick or high-density parts. Thin sheet metal might reach 220°C quickly; a thick aluminum block loaded densely might only reach 180°C after the same time in the same oven.
The result: inconsistent cure quality. Some parts get adequate crosslinking, others don't. Your field failures (premature peeling, poor chemical resistance) often trace back to under-cured batches.
We advise clients to:
- Measure actual workpiece temperature (thermal imaging or embedded thermocouples)
- Adjust oven temperature and dwell time to ensure all parts reach target temperature
- Test batch consistency with adhesion testing and hardness testing periodically
| Issue | Root Cause | Check Point |
|---|---|---|
| Uneven cure | Parts not reaching target temp | Measure actual workpiece temp |
| Soft coating | Under-curing | Extend dwell time or raise oven temp |
| Brittleness, yellowing | Over-curing | Reduce oven temp or dwell time |
| Weak adhesion across batches | Inconsistent pre-treatment | Verify phosphate film thickness |
| High powder waste | Poor grounding or slow line speed | Check electrical resistance, adjust conveyor speed |
Common Powder Spraying Defects and Root Cause Analysis
Now we get to the practical troubleshooting. These are the actual defects we see in the field, and the systematic way to diagnose them.
Orange Peel Texture: Causes and Fixes
Orange peel—that dimpled, bumpy surface finish—is often blamed on "bad spray technique," but it usually has other causes.
Likely causes:
- Powder film too thick (user applied too much powder in a single pass)
- Inadequate powder flow properties (old powder that's been sitting in humid storage)
- Oven temperature too high or heating too fast (powder can't flow smoothly before setting)
- Workpiece too hot before entering the oven (pre-heated by sun or previous process, causing rapid surface solidification)
Our typical fix sequence:
First, we reduce the amount of powder per pass—use multiple lighter coats instead of one heavy coat. Second, check powder date and storage conditions; old powder often has poor flow. Third, confirm oven temperature curve matches the powder datasheet. Fourth, cool workpieces to ambient temperature before sending to the oven if they're coming from a hot process.
Poor Adhesion and Coating Delamination
This is one of the most serious defects because it often only shows up after the customer receives the product.
Root causes (in order of frequency from our experience):
- Pre-treatment incomplete (most common)
- Insufficient phosphate film thickness
- Moisture present during curing
- Under-curing
- Incompatibility between substrate material and coating system
Diagnosis approach:
Start with pre-treatment. Examine a cross-section of a failed sample under magnification. If the phosphate layer looks thin or patchy, your pre-treatment system needs adjustment. Check degreasing temperature, concentration, immersion time, and rinse water quality. If pre-treatment looks good, check for moisture—spray a light mist of water on a curing oven exhaust; if you see visible condensation, your oven inlet is drawing humid air.
Pinhole and Crater Defects
Pinholes are tiny holes in the cured coating. Craters are slightly larger with a raised rim.
Typical sources:
- Moisture in compressed air (most common)
- Trapped air or moisture on the workpiece surface during application
- Contamination in the powder
- Outgassing from the substrate during curing
Systematic troubleshooting:
First, check your compressed air system—this is the quickest win. Drain water traps, replace filters, and verify drier function. If the air is clean, inspect the workpiece surface immediately before spraying. Ensure pre-treatment drying is complete. If issues persist, examine your powder storage—is it in a dry location? Moisture-contaminated powder leads to consistent pinhole problems across many parts.
Uneven Film Thickness
You measure film thickness with a gauge and find 80 µm in one area, 120 µm in another.
Causes:
- Spray gun distance varying (operator moving too close/far)
- Uneven workpiece grounding
- Line speed fluctuation
- Powder feed rate inconsistency
- Automatic spray gun trajectory not matching part geometry
Fix approach:
For manual spraying, standardize gun distance and technique. For automatic lines, verify the spray gun programming against the actual part CAD model. Check that all workpieces are making proper electrical contact with the conveyor. Verify conveyor speed is stable (worn chain or improper tension can cause speed variation).
Insufficient or Excessive Curing
Under-cured parts feel soft, have weak adhesion, and fail solvent resistance testing. Over-cured parts are brittle, may discolor, and have reduced impact resistance.
Root cause:
Mismatch between oven parameters and the actual powder formulation, or incorrect workpiece actual temperature.
Correction:
Always confirm the powder manufacturer's recommended cure schedule. Verify workpiece actual temperature (not just oven air temperature) reaches the target for the specified time. Adjust oven setpoint and/or conveyor speed accordingly. Test cured samples with standardized methods—impact resistance, adhesion tape test, solvent resistance—to confirm proper cure.
Incomplete Coverage in Complex Geometries (Faraday Cage Effect)
On complex parts with deep recesses, internal angles, or tight cavities, you'll notice areas where powder simply won't deposit, no matter how long you spray.
This is the Faraday cage[^8] effect: the electrostatic field can't easily penetrate tight spaces, so charged powder particles can't reach those areas.
Mitigation strategies:
- Lower the spray voltage (reduces boundary layer effect, allows powder to reach more areas)
- Reduce powder flow rate and extend spray time (allows more powder to settle)
- Rotate or reorient the workpiece mid-spray to attack recesses from different angles
- Use multi-layer spraying if the part geometry allows
- For severe cases, consider friction spray guns instead of corona guns for portions of the process
 )
)
Pre-treatment: Why It's the Foundation of Spray Quality
We keep returning to this point because it's genuinely that important. From our years managing coating lines across different industries—cabinets, furniture, aluminum profiles—the pattern is consistent: shops that struggle with quality almost always have pre-treatment issues, not spray booth issues.
Common Pre-treatment Failures and Their Impact
Incomplete degreasing leads to residual oil. Oil prevents wetting of the surface and interferes with phosphate film formation. You get weak phosphate layers and poor powder adhesion.
Inadequate rinsing leaves residual salts or degreaser on the surface. These dissolve into moisture and cause electrolytic corrosion under the coating, leading to eventual peeling and base material rust.
Insufficient acid pickling or abrasion leaves oxidation and mill scale on the surface, which oxidizes further and interferes with phosphate formation.
Poor drying is insidious because the coating might look fine initially. But moisture trapped under the powder causes outgassing during curing, creating pinholes and cratering.
Phosphate film too thin or uneven reduces the adhesion layer quality. The film should be visible as a consistent grayish layer; if it's spotty or barely perceptible, your process is inadequate.
Phosphate Film Thickness and Inspection
Phosphate conversion coating thickness directly correlates to coating adhesion and corrosion resistance. We recommend checking film thickness periodically using an X-ray fluorescence (XRF) gauge or by microscopic cross-section analysis.
Target phosphate film thickness typically ranges from 1–3 micrometers, depending on the substrate and application. Too thin and adhesion is weak. Too thick and you can get brittleness and poor powder flow.
To verify adequacy, measure multiple parts from each batch. If variation is high (some 1 µm, some 2.5 µm), your pre-treatment process chemistry or residence time is inconsistent.
Rinsing and Drying Completeness
After phosphating, workpieces must be thoroughly rinsed to remove all residual bath chemistry. Inadequate rinsing leaves salts that absorb moisture and cause failure.
Then comes drying. Most coating failures traced back to "poor adhesion" actually originated here: the workpiece still had surface moisture when powder was applied. Moisture interferes with the electrostatic charge and creates gas pockets that become pinholes during curing.
Verify drying adequacy by touch—parts should feel completely dry, not just "not visibly wet." Consider adding a drying oven if you're currently relying only on air blowoff.
Parameter Tuning and Process Optimization
Once your pre-treatment and infrastructure are solid, then it makes sense to dial in spray parameters.
Spray Distance, Voltage, and Powder Feed Rate Adjustment
These three parameters form an interdependent system, not three independent settings.
Spray distance (typically 150–300 mm) affects charge transfer efficiency and coating uniformity. Too close and you get edge buildup and reverse atomization; too far and powder loses charge and transfer efficiency drops.
Voltage (typically 60–90 kV) controls the strength of the electrostatic field. Higher voltage increases transfer efficiency but also increases the risk of edge over-coating and powder bounce-back. Lower voltage reduces edge effects but can result in poor coverage and increased overspray waste.
Powder feed rate (measured in grams/minute or determined by air pressure through the feed system) controls how much material reaches the workpiece. Higher feed rates reduce spray time per part but can lead to overspray and thickness variation; lower rates increase spray time but improve evenness.
Our typical tuning approach: start with mid-range settings per the gun manufacturer. Spray test parts and measure film thickness. If thick, reduce feed rate. If thin, increase feed rate or reduce line speed. If coverage is uneven, adjust gun distance or angle. Verify grounding before assuming spray gun settings are wrong.
Handling Moisture-Affected and Caked Powder
Powder stored in humid environments absorbs moisture and cakes up. This causes two problems: poor flow through the feed system (bridging, clogging) and poor quality when applied (rough surface, pinholes).
If powder has been in humid storage for weeks, consider it compromised. We usually recommend rotating stock and storing powder in sealed containers with desiccant packs in a climate-controlled area.
If you must use older powder, run a test batch first. Blend it 50/50 with fresh powder to minimize risk. Monitor spray consistency and final coating quality closely.
Multi-layer Spraying and Workpiece Positioning for Complex Parts
For parts with complex geometry, a single spray pass often can't achieve even coverage everywhere. Multi-layer spraying means spraying the part, allowing it to pass through the oven for a partial cure, then spraying again.
This approach works well for:
- Parts with deep recesses where single-pass coverage is difficult
- Thin-walled sections that need adequate thickness
- Complex assemblies where rotating the part mid-line isn't practical
For optimal results, position the workpiece to maximize spray coverage during the first pass—then rotate it before the second spray to hit areas that were shadowed. This requires coordination with your conveyor design.
Quick Diagnostic Checklist for On-Site Troubleshooting
When a quality problem appears, here's the sequence we use to isolate the root cause quickly:
Step 1: Inspect the workpiece surface before spraying
- Is it visibly clean and dry?
- Does it feel dry to the touch?
- Any oil marks, dust, or water spots?
- If not pristine, restart the pre-treatment.
Step 2: Check the compressed air
- Drain water traps on the compressor and after-cooler.
- Listen for air leaks throughout the system.
- Check drier operation (visual indicator should show green).
- Measure pressure and verify it's stable at 4–6 kg/cm².
Step 3: Verify grounding
- Confirm the workpiece is making good electrical contact with the fixture.
- Clean any oxide or dirt at contact points.
- Check that the ground cable to the spray booth is intact and tight.
- Measure electrical resistance if equipment is available (target under 1 MΩ).
Step 4: Examine spray gun operation
- Is the gun nozzle clean (no powder buildup)?
- Is the electrode clean and not scorched?
- Is high voltage output showing (listen for faint crackling sound)?
- Spray test onto a grounded metal plate to verify powder cloud uniformity.
Step 5: Measure and record film thickness
- Use a calibrated gauge to check multiple areas of several parts.
- Record: average thickness, range, and problem areas.
- Compare to specification.
Step 6: Check oven conditions
- Verify oven thermostat reads expected setpoint.
- Measure actual workpiece temperature (use thermal imaging or embedded sensor).
- Confirm air circulation (feel for hot air flow inside oven).
- Measure curing time (part entry to exit).
Step 7: Examine and test the powder
- Check powder date; if over 6 months old or stored in humid area, consider replacement.
- Verify color matches requirement.
- Feel texture: should be free-flowing, not caked or lumpy.
- Run small test batch and evaluate result.
This sequence moves from most-likely-to-cause-problems to least-likely. In about 80% of real situations, one of the first three steps reveals the issue.
| Defect Type | First Check | Second Check | Third Check |
|---|---|---|---|
| Poor adhesion | Pre-treatment process (phosphate thickness) | Workpiece moisture (drying completeness) | Oven cure (temperature & time) |
| Uneven thickness | Grounding integrity | Spray gun distance consistency | Line speed stability |
| Pinholes/craters | Compressed air (dryness) | Pre-treatment (moisture) | Powder (moisture contamination) |
| Orange peel | Powder flow properties (age/storage) | Oven temperature profile | Spray technique (film too thick) |
| Coverage gaps on complex parts | Spray gun voltage/angle | Workpiece positioning | Multi-pass approach needed |
Conclusion: From Theory to Practice
Powder electrostatic spraying is mature, proven technology. When it works well, the quality is excellent and the process is repeatable. When problems appear, they're almost always traceable to a specific, fixable root cause.
The difference between a factory that consistently produces excellent coatings and one that struggles with quality typically isn't the spray booth model. It's attention to pre-treatment, infrastructure (especially compressed air), grounding, and systematic troubleshooting rather than random parameter adjustments.
From our experience working with hundreds of production lines across cabinet, furniture, and aluminum industries, we've found that investing time upfront in understanding how these systems interact—and building a simple diagnostic routine—pays off in lower scrap rates, less rework, faster problem resolution, and ultimately, higher customer satisfaction.
If your line is experiencing persistent quality issues or you're planning a new installation, we recommend a thorough assessment of pre-treatment adequacy, compressed air cleanliness, and electrical grounding. Often, fixing these three areas resolves 90% of coating defects without touching a single spray gun parameter.
For technical support, training, or guidance on optimizing your existing line, we're available to discuss your specific situation. Reach out to us at WhatsApp: +8618925987762 or email: ketucoatingline@gmail.com. We're happy to walk through your process and identify where improvements can make the biggest impact.
[^1]: Overview of powder coating technology, including process principles, equipment components, and industrial applications across manufacturing sectors.
[^2]: Information on volatile organic compounds, their environmental and health impacts, and regulatory framework for air quality standards.
[^3]: Details on phosphate and conversion coating processes, film formation mechanisms, and their role in corrosion protection and coating adhesion.
[^4]: Explanation of separation process principles, cyclone and filtration technologies used in powder recovery systems for industrial applications.
[^5]: Technical overview of cyclonic separation principles, equipment design, efficiency metrics, and applications in powder coating recovery systems.
[^6]: Fundamental concepts of electrical resistance and conductance, measurement methods, and practical implications for grounding systems in electrocoating processes.
[^7]: Scientific explanation of chemical crosslinking mechanisms in thermoset coatings, cure kinetics, and relationship between curing conditions and final coating properties.
[^8]: Explanation of Faraday cage effect in electrostatic fields, how geometry affects field penetration, and implications for powder deposition on complex part geometries.
 English
  German
  Vietnamese
  French